SQL Developer + tnsnames.ora for UWM

Posted by Quinn Madson | Posted in | Posted on 12:22 PM

0

After completing the steps below for your platform, TNS aliases will be available in Oracle SQL Developer in the "New/Select Database Connection" dialog by selecting "TNS" for the "Connection Type" combo box. These steps are only necessary if you can't or don't want to install the Oracle Client for your platform.

For Linux machines:
-get tnsnames.ora from: https://mumbles.imt.uwm.edu/dbdoc/tnsnames-noworld.php
-copy the file to: /etc

For Windows XP machines:
-get tnsnames.ora from: https://mumbles.imt.uwm.edu/dbdoc/tnsnames-world.php
-copy to c:\tnsnames\ (or some other directory where it will never be moved)
-right-click "My Computer" and select "Properties"
-click "Advanced" tab
-click "Environment Variables"
-under "System variables" click "New"
-"Variable name:" TNS_ADMIN (must be caps)
-"Variable value:" c:\tnsnames\ (or whatever directory you used above)
-Click "OK"
-Click "OK"
-Click "OK"

Ref:
http://wiki.oracle.com/page/SQL+Developer+FAQ?t=anon

* How does SQL Developer find my TNSNames file?
o SQL Developer checks the following:
1) $HOME/tnsnames.ora
2) $TNS_ADMIN/tnsnames.ora
3) /etc/tnsnames.ora ( non-windows )
4) $ORACLE_HOME/network/admin/tnsnames.ora
5) Registry Key

Wicked Juju

Posted by Quinn Madson | Posted in | Posted on 11:05 PM

0

Spent a few hours migrating from an old media server to a new one. For the most part everything went great except the MediaMVP running MVPMC would not load the dongle.bin.config. I assumed my TFTP server was mis-configured, the mvpmc commandline switches were wrong, etc.

No dice!

Found this wicked juju from: http://mlblog.osdir.com/multimedia.mvpmc.user/2006-05/msg00020.shtml
Reposting it here for posterity:

Guys,

See my post in the user group. I've posted an incantation that allows the MVP to boot. The problem with this H1 appears identical to the same problem I have with my H2. I'm posting an update later on more findings I've had with long vs short power cycles and using MVP relay. Here's the reader's digest procedure to get a successful boot (from an H2):

After trying several experiments, the following sequence got me back to reliable time and time again booting (until you boot from flash again):

* Unplug the MVP for (I got it to work with a 90 second to 120 second cycle).
* After the 120 seconds have elapsed, unplug the ethernet cable (I think leaving it plugged in may help bleed off any capacitors)
* Apply the power again and wait for the MVP to get to the point where it complains about not finding a server and asks you to press OK to re-scan. You'll also notice that your "favorite server" has disappeared from the list.
* Power it down
* Plug in the ethernet cable
* Power it up (no waiting)
* You should get past the hanging last square
* When you get to the screen that states to press OK within 3 seconds to configure press OK
* You should notice that the MVP is re-scanning and your available server should appear on the list.
* Press OK to save the configuration (this takes a while and I suspect clears out any "bad" data that may be causing the problem)
* The MVP restarts
* You get to the screen with the 10 squares and dongle.bin.ver is requested and served at about the 3rd square. Then dongle.bin gets requested and served and now the text LOADING APPLICATION appears above the 10 squares and they all fill completely and stop once all full (NOTE: only one cycle and the LOADING APPLICATION seem to indicate that its working)
* There is a delay as the mvpmc application loads and screen flashes as it boots up perfectly.

Please let me know if this works for you as well...

Cheers...

Sergio
It works ... as goofy as it seems ... it works.

CAS + ColdFusion

Posted by Quinn Madson | Posted in | Posted on 9:24 AM

3

The example available from JA-SIG is some of the ugliest code I've seen lately. This is what I came up with (based on their example code):
Application.cfm

<cfapplication name="my_awesome_app_name_here"
clientmanagement="yes" sessionmanagement="yes"
setclientcookies="yes" setdomaincookies="no"
loginstorage="session">
index.cfm
<!--- globals --->
<cfparam name="url.ticket" default="">
<cfparam name="username" default="">
<cfparam name="url.action" default="">
<cfscript>
cas_path = "https://cas-server.example.edu/cas/";
app_path = "https://coldfusion-server.example.edu/path/to/this/app/";
cas_url = cas_path & "login?" & "service=" & app_path;
</cfscript>

<!--- session init --->
<cflock timeout="10" scope="session" type="readonly">
<cfparam name="session.username" default="">
<cfparam name="session.authorized" default="0">
</cflock>

<!--- logout action --->
<cfif url.action eq "logout">
<!--- session reset --->
<cflock scope="session" timeout="30" type="exclusive">
<cfset session.username = "">
<cfset session.authorized = "0">
</cflock>

<cfset cas_url = cas_path & "logout">
<cflocation url="#cas_url#" addtoken="false">

<cfelse>
<!--- auth check --->
<cfif not len(trim(session.username))>
<cfif not len(trim(ticket))>
<cflocation url="#cas_url#" addtoken="no">
<cfelse>
<cfset cas_url = #cas_path# & "serviceValidate?ticket=" & url.ticket & "&" & "service=" & app_path & "/">
<cfhttp url="#cas_url#" method="get"/>
<cfset objXML = xmlParse(cfhttp.filecontent)>
<cfset SearchResults = XmlSearch(objXML,"cas:serviceResponse/cas:authenticationSuccess/cas:user")>

<cfif arraylen(SearchResults)>
Raw XML:<cfdump var="#cfhttp.filecontent#">
<cfdump var="#objXML#" label="CAS Results">
<cfdump var="#SearchResults#" label="Parsed CAS Results">
<cfset username = SearchResults[1].XmlText>
<cflock scope="session" timeout="30" type="exclusive">
<cfset session.username = username>
<cfset session.authorized = "1">
</cflock>
<cfelse>
<cflocation url="#cas_url#" addtoken="no">
</cfif>
</cfif>
</cfif>


<cfif structKeyExists(url, "accessdenied")>
Access Error
<cfelse>
Authenticated.<br/>
<cfdump var="#session#" label="ColdFusion Session Object">
<a href="?action=logout">Logout</a><br/>
</cfif>
</cfif>
Honestly, it's a pretty simple process:
  • Check for a ColdFusion session
  • If one doesn't exist, redirect to CAS and provide a call back URL
  • When CAS redirects back to your application you grab the ticket and verify it server to server via cfhttp.
  • If the ticket checks out, you create a ColdFusion session and use it within your application.
The point of this example is to keep it simple. The code is commented to clue you into where the different components would plug into the framework of your choice.

Zimbra URLs

Posted by Quinn Madson | Posted in | Posted on 7:08 AM

1

Zimbra has a bunch of built in functionality for rendering HTML versions of calendars as well as feeds such as RSS. This keeps coming up with Zimbra users inside and outside of our organization. I'm posting it here for future reference.

For an HTML representation of a public calendar we use a URL like this:

https://pantherlink.uwm.edu/zimbra/home/qkmadson/calendar.html?view=week

The view=week is optional; I just wanted to show an example. The view defaults to a month view and can be changed by the user. If the calendar is not set to public, you'll get a permission error. If you want to show a private calendar, you can use something like:

https://pantherlink.uwm.edu/home/bmaas/?fmt=freebusy&view=week

This will show the free and busy information but, no meeting details. For your purposes, you will need to change "pantherlink.uwm.edu" to your Zimbra server and change "qkmadson" or "bmaas" to one of your usernames. You may want to take a look at this blog entry:

http://www.zimbrablog.com/blog/archives/2006/01/rest-update.html

The show examples of how to use various feed options in Zimbra. For example, if you wanted to use RSS:

https://pantherlink.uwm.edu/zimbra/home/qkmadson/calendar.rss

RapidSVN currently broken in Ubuntu Repository

Posted by Quinn Madson | Posted in | Posted on 9:01 AM

0

The current package for RapidSVN segfaults constantly with the current version (as of today's date) in the Hardy Heron repos. To fix this:

  • Grab the Intrepid Ibex package by editing: /etc/apt/sources.list
  • Do a search and replace: "hardy" for "intrepid".
  • Update your packages and reinstall RapidSVN.
You can do this from the GUI side with gedit and synaptic. From the command line:
sudo -s
vim /etc/apt/sources.list

in vi:
:%s/hardy/intrepid/gi
:wq!

command line:
apt-get update
apt-get install rapidsvn
At this point, you should switch back to the hardy repos by editing sources.list and re-replacing intrepid for hardy.

Network Debugging w/ MVPMC

Posted by Quinn Madson | Posted in | Posted on 6:12 PM

0

While running the MVPMC software on MVC devices, sometimes I will receive an error that the streaming server cannot be found.

Check /var/log/messages for:

 dhcpd: DHCPACK on 192.168.0.51 to 00:0d:fe:39:21:06 via eth0

if that's the last message, make sure you run:
/usr/sbin/in.tftpd -l -a :16869 -s /tftpboot -v
/usr/bin/mvprelay 16881 5906 6337 192.168.0.1 &

Extending the Zimbra Canvas

Posted by Quinn Madson | Posted in | Posted on 11:17 AM

1

The Zimbra Canvas is pretty cool but, somewhat limited from the Zimlet XML definition file. For example, you cannot modify the buttons of the container if it's called from the XML. You can get around it by using the Zimbra JavaScript implementation.

It's pretty easy to get a canvas going from the JS side but, I was having issues getting the iframe style <actionUrl> functionality from the XML side. I had to reverse engineer this based on the source of ZmZimletBase();.

Here is the XML:

<zimlet name="edu_myschool_myzimlet" version="1.0" description="Some Zimlet">

<include>http://www.myschool.edu/LOCATION/TO/ZIMLET/zimlet.js</include>
<includeCSS>http://www.myschool.edu/LOCATION/TO/ZIMLET/zimlet.css</includeCSS>
<handlerObject>Edu_myschool_myzimlet</handlerObject>

<zimletPanelItem label="Some Zimlet" icon="My-panelIcon">
<toolTipText>This is a super awesome zimlet that does something.</toolTipText>
<contextMenu>
<menuItem label="Do something" id="doSomething" icon="My-panelIcon">
<canvas type="dialog" width="700" height="500" />
<actionUrl target="http://www.myschool.edu/LOCATION/TO/MASHUP/AWESOMENESS/" />
</menuItem>
</contextMenu>
</zimletPanelItem>
</zimlet>
This sets a right-click menu using the <zimletPanelItem> directive. More importantly, (for us, right now) is that it calls out to our JavaScript. Here is what the JavaScript should look like:
function Edu_myschool_myzimlet() {
}

Edu_myschool_myzimlet.prototype = new ZmZimletBase();
Edu_myschool_myzimlet.prototype.constructor = Edu_myschool_myzimlet;

Edu_myschool_myzimlet.prototype.init =
function() {
};

// Called by the Zimbra framework when the panel item was double clicked
Edu_myschool_myzimlet.prototype.doubleClicked = function() {
this.singleClicked();
};

// Called by the Zimbra framework when the panel item was clicked
Edu_myschool_myzimlet.prototype.singleClicked = function() {

var view = new DwtComposite(this.getShell());
view.setSize("500px", "500px");
var el = view.getHtmlElement();
var myBox = document.createElement("div");
el.appendChild(myBox);

var html = new Array();
var i = 0;
html[i++] = "First line of HTML <br/>";
html[i++] = "More lines of HTML";

// package up html and display it
myBox.innerHTML = html.join('');
this._dialog = this._createDialog({title:"My Dialog Title", view:view});
this._dialog.setButtonListener(DwtDialog.OK_BUTTON, new AjxListener(this, this.myHandler));
this._dialog.setButtonTitle(DwtDialog.OK_BUTTON, "Go go gadget Zimlet!");
this._dialog.popup();
};

Edu_myschool_myzimlet.prototype.myHandler =
function(ev) {
//do come more stuff: web services, api calls, etc
this._dialog.popdown();
}
This will show some HTML within the Zimbra Canvas. You can create a form and allow it to call web services, the Zimbra API, etc based on what the user did. This is pretty handy. Also, if you look at the code, you can add handler functions to the buttons, change the button text, etc.

In some cases, you may just want to call out to some other code: PHP, JSP, ASP, (or in my case) ColdFusion, etc. To do an iframe the exact same way that <actionUrl> does, change the click action functions:
Edu_myschool_myzimlet.prototype.singleClicked =
function() {
var view = new DwtComposite(this.getShell());
view.setSize("700px", "500px");
var el = document.createElement("iframe");
el.src = "http://www.myschool.edu/PATH/TO/MY/CODE/mashup.cfm";
var sz = view.getSize();
if (!AjxEnv.isIE) {
// substract default frame borders
sz.x -= 4;
sz.y -= 4;
}
el.style.width = sz.x + "px";
el.style.height = sz.y + "px";
view.getHtmlElement().appendChild(el);

//TITLE OF THE DIALOG BOX
var dialog_args = {
title : "Example",
view : view
};
var dlg = this._createDialog(dialog_args);
dlg.popup();
};
From here you could add code to modify the buttons, pass a query string from JavaScript via the URL, etc.

Dual Network Booting (Mythbuntu, MediaMVP, and random crappy laptops)

Posted by Quinn Madson | Posted in | Posted on 7:27 PM

0

Background
I built a Mythbuntu machine out of a Dell PowerEdge 1600SC dual Xeon box with a Hauppauge PVR-500 dual TV tuner. Because I'm cheap *and* wanted to run a gigabit network, this machine also serves as the router for a gigabit switch (which was 1/3 the cost of a gigabit router).

I ended up getting 2 Hauppauge MediaMVPs. It's basically a small (1.5 x 6.5 x 5.5-inches), cheap 300MHz PowerPC that boots off the network and plays music, video, and pictures off your network. A group of developers released their own software available at: http://mvpmc.org that runs a small linux distro and can connect to: MythTV, ReplayTV, Hauppauge, VLC, SqueezeCenter (aka SlimServer) with various other bells and/or whistles.

I also have a few busted up laptops with no hard drives. I wanted to be able to netboot the MediaMVPs and use Mythbuntu's diskless server for the laptops. (I let the kids use one for flash based games and I use one in our home theater.)

There wasn't great documentation on how to do this so, hopefully this helps people out somewhat in the future. There are some decent guides to get MVPMC working with Mythbuntu but, they use the aTFTP server which conflicts with Mythbuntu's diskless server.

HOW-TO:
DHCP:
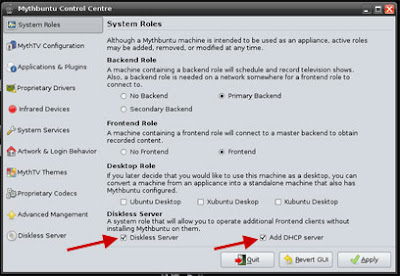
On the Mythbuntu media server, go to:

  • Applications >> System >> Mythbuntu Control Centre >> System Roles.
  • Check "Diskless Server" and "Add DHCP server"
  • Click "Apply"

A progress bar will whir away and eventually the "Mythbuntu Control Centre" dialog will come back. The "Diskless Server" option on the left side menu should now be available. When you go to it, there is a drop-down menu for "CPU architecture of your clients". Select "i386". Click "Build Image" and "Apply". This process can take a long time and sometimes fails.

To check, go to: Applications >> Accessories >> Terminal.

At the prompt type:
ls /opt/ltsp
If you see:

i386 images
... you should be all set. If the "images" directory is missing, the build failed. If the build failed, at the command prompt type:
sudo rm -rf i386
sudo ltsp-build-client --mythbuntu --mythbuntu-copy-user-credentials
If the first command fails, you can try going back to the Myth Control Centre. Diskless Server >> CPU architecture of your clients: >> i386 >> Delete Image >> Apply. DO NOT run the second command from a root shell (only run it through sudo) or it will take a long time and eventually fail.

Moving along, commandline:
sudo -s
vim /etc/dhcp3/dhcpd.conf
[or if you don't like the vi editor (wha?) use something else]
make the file look like this:

authoritative;

log-facility local7;

option domain-name "madsonclan.net";
option subnet-mask 255.255.255.0;
option domain-name-servers 65.24.7.10, 65.24.7.11;

allow bootp;
allow booting;

#option ip-forwarding false; # No IP forwarding
#option mask-supplier false; # Don't respond to ICMP Mask req

subnet 192.168.0.0 netmask 255.255.255.0 {
option routers 192.168.0.1;
range 192.168.0.100 192.168.0.250;
option broadcast-address 192.168.0.255;
option subnet-mask 255.255.255.0;
option root-path "/opt/ltsp/i386";
if substring( option vendor-class-identifier, 0, 9 ) = "PXEClient" {
filename "/ltsp/i386/pxelinux.0";
} else {
filename "/ltsp/i386/nbi.img";
}

}

group {
next-server 192.168.0.1; # IP address of your TFTP server

host mvp { # NOTE: Change the hardware ethernet to the MAC address of your actual MVP
hardware ethernet 00:0d:fe:39:21:04;
fixed-address 192.168.0.50;
filename "dongle.bin.mvpmc";
option root-path "/home/mvp,rsize=4096,wsize=4096,nolock";
}
host mvp2 {
hardware ethernet 00:0d:fe:39:21:06;
fixed-address 192.168.0.51;
filename "dongle.bin.mvpmc";
option root-path "/home/mvp,rsize=4096,wsize=4096,nolock";
}
}
[substitutions]
madsonclan.net = yourdomain.com or make something up
65.24.7.10, 65.24.7.11 = your ISP dns servers
192.168.0.XXX = your internal IP addresses
00:0d:fe:39:21:04/06 = the MAC address of you MediaMVP (sticker on the bottom)

MVPMC:
Go get the latest dongle.bin from: mvpmc.org
and then:
mkdir /tftpboot
cp [DOWNLOADED_FILE] /tftpboot/dongle.bin
dd if=/tftpboot/dongle.bin of=/tftpboot/dongle.bin.ver bs=1 count=40 skip=52
vim /tftpboot/dongle.bin.config
file should like:
# set up host environment variable
HNAME='mvp_uno'
export HNAME

# time stuff
TZ='US, Central: CST+6CDT,M3.2.0/2,M11.1.0/2'
export TZ
echo "TZ='US, Central: CST+6CDT,M3.2.0/2,M11.1.0/2'" >; /etc/shell.config
echo "export TZ" >> /etc/shell.config
NTP=time-a.nist.gov

# create an /etc/hosts file
echo "127.0.0.1 localhost localhost" >> /etc/hosts
echo "192.168.0.1 media-server media-server" >> /etc/hosts
echo "192.168.0.1 eteo eteo" >> /etc/hosts #important! or mythtv won't play. replace eteo w/ myth server hostname

# load settings
. /etc/udhcpc.config
SETTINGSDIR=/tmp/settings
mkdir -p ${SETTINGSDIR}
SETTINGS=${SETTINGSDIR}/settings
RSETTINGS=settings.${HNAME:-$IP}
LASTSAVED=${SETTINGSDIR}/.lastsaved
touch $LASTSAVED
tftp -g -r $RSETTINGS -l $SETTINGS $SERVER;

# mounts (change for your network)
# i use nfs for linux and cifs for xp
mkdir /media
mkdir /media/sde1
mkdir /media/sda1
mkdir /media/sdb1
mkdir /media/quinn
mount -t nfs -o nolock,rsize=4096,wsize=4096,nfsvers=3 192.168.0.1:/media/sde1 /media/sde1
mount -t nfs -o nolock,rsize=4096,wsize=4096,nfsvers=3 192.168.0.1:/media/sda1 /media/sda1
mount -t nfs -o nolock,rsize=4096,wsize=4096,nfsvers=3 192.168.0.1:/media/sdb1 /media/sdb1
#mount -t nfs -o nolock,rsize=4096,wsize=4096,nfsvers=3 192.168.0.1:/media/quinn /media/quinn
mount.cifs //192.168.0.23/quinn /media/quinn/ -o user=someuser,pass=somepass,rsize=34000

# save settings
(
while true; do
if [ $SETTINGS -nt $LASTSAVED ] ; then
tftp -p -l $SETTINGS -r $RSETTINGS $SERVER;
touch $LASTSAVED;
fi;
sleep 300;
done
)&

# mvpmc settings

#known working
#mvpmc -f /etc/helvB14.pcf -o composite -S 0 -D 192.168.0.1:0 -R 192.168.0.1 -s 192.168.0.1 --vlc 192.168.0.1 --vlc-vopts svcd -y 192.168.0.1 -T mythconverg -u mythtv -p 8DelSgNw -b /eteo/livetv --weather-location USWI0164 &

#real-world
mvpmc -f /etc/helvB14.pcf -o svideo -a 16:9 -S 0 -R 192.168.0.1 -s 192.168.0.1 -y 192.168.0.1 -T mythconverg -u mythtv -p myMythTvPassowrd-b /eteo/livetv --weather-location USWI0164 --vlc 192.168.0.1 --vlc-vopts svcd &
Change IPs, hostnames, drive mappings, weather code, etc for your needs.

TFTP/NBD:
vim /etc/inetd.conf
tftp  dgram  udp  wait  root  /usr/sbin/in.tftpd /usr/sbin/in.tftpd -s /tftpboot
9571 stream tcp nowait nobody /usr/sbin/tcpd /usr/sbin/ldminfod
9572 stream tcp nowait nobody /usr/sbin/tcpd /usr/sbin/nbdswapd
2000 stream tcp nowait nobody /usr/sbin/tcpd /usr/sbin/nbdrootd /opt/ltsp/images/i386.img

vim /etc/nbd-server/config
[generic]
# If you want to run everything as root rather than the nbd user, you
# may either say "root" in the two following lines, or remove them
# altogether. Do not remove the [generic] section, however.
user = nbd
group = nbd

# What follows are export definitions. You may create as much of them as
# you want, but the section header has to be unique.
[export]
exportname = /opt/ltsp/images/i386.img
port = 2000

If you are running a firewall, poke holes in it for tftp(:69), nbd(:2000), mythtv, etc. I recommend you make all ports open for the internal network.
/etc/init.d/dhcdbd restart
/etc/init.d/dhcp3-server restart
/etc/init.d/nbd-server restart
/etc/init.d/xinetd restart
If you are running a firewall, you need to disable when the MediaMVP first boots. I can't explain why but, I'm pretty sure it's an issue at the hardware level. When you power off the system via the remote and turn it back on, you don't need to mess with the firewall. However, if you lose power and you see the big blue MediaMVP initial boot screen, you need to disable the firewall until you see "Application Loading". If you don't the MediaMVP will not be able to get an IP address or find the Mythbuntu server.

Oh yea:
I may be missing a few things in this HOW-TO. If you are running the H3 wireless or have some other goofy setups, you may want to refer to this HOW-TO: https://help.ubuntu.com/community/MythTV/MediaMVP_Frontend

Otherwise, you should be pretty much good to go at this point. Any laptop or other i386 arch machine you plug-in and netboot off of should get Mythbuntu via squashfs read-only. The cool thing is that the server assigns a AUFS share via NFS based on the MAC address of the machine. If you save anything to the desktop, make settings changes, install software, etc and reboot, those changes will remain intact. If any methyl-ethel-bad-stuff happens, take a look in: /var/cache/mythbuntu-diskless/overlay and nuke the directory that corresponds to MAC address and it will rebuild itself on the next boot.

Still have problems:
This forum thread is pretty invaluable and if all else fails, ask them: http://ubuntuforums.org/showthread.php?t=711079

HOW-TO: HTC 6800/Mogul/Titan as USB Modem in Ubuntu

Posted by Quinn Madson | Posted in | Posted on 9:36 AM

1

sudo -s
apt-get install subversion
svn co http://synce.svn.sourceforge.net/svnroo … rndis-lite
cd usb-rndis-lite/
make
./clean.sh
make install
vim /etc/network/interfaces
add:
auto rndis0
iface rndis0 inet dhcp
reboot

Plug in the phone via USB. On the phone go to programs/applications and select "Internet Sharing"

PC Connection:USB
Network Connection: Phone as Modem

Click "Connect"

Fire up a web browser, should be all set.

PHP4 & XML Generation

Posted by Quinn Madson | Posted in | Posted on 8:31 AM

0

<?php
// generate xml mime type
header ("content-type: text/xml");

// create xml document
$doc = domxml_new_doc('1.0');

// create xml root
$root = $doc->create_element("xml_root");
$root = $doc->append_child($root);

// create xml node
$item = $doc->create_element("xml_item");
$item = $root->append_child($item);

// add some text to the node
$item_text = $doc->create_text_node("yo yo");
$item = $item->append_child($item_text);

// generate xml output
$xml_string = $doc->dump_mem(true);
echo $xml_string;
?>
would generate:

<?xml version="1.0"?>
<xml_root>
<xml_item>yo yo</xml_item>
</xml_root>

PHP & LDAP

Posted by Quinn Madson | Posted in | Posted on 8:24 AM

0

// get username and password via form scope
$user = $_POST["username"];
$pass = $_POST["password"];

// format username for uwm ldap auth
$basedn = "ou=people,o=somewhere.edu";
$ldap_user = "uid=" . $user . "," . $basedn;

// connect to uwm ldap server
$ds=ldap_connect("ldap://ldap.uwm.edu");

if ($ds) {
// bind to uwm ldap server
$r=ldap_bind($ds, $ldap_user, $pass);
}

// close out ldap connection
ldap_close($ds);
Your basedn may vary. Also, the protocol, ldaps://. supposedly works but so far, I have had no luck. I have a sneaking suspicion that it has something to do with self-signed certificates.

HOW TO: Install Flex Builder 3 Alpha on Hardy Heron 64-bit

Posted by Quinn Madson | Posted in | Posted on 12:56 PM

0

32-bit Java Runtime Environment needs to be installed (which can be done through synpatic/apt-get).

Run the following at the command line:

export PATH=/usr/lib/jvm/ia32-java-6-sun/bin/:$PATH
Install the firefox-2 package from synaptic/apt-get.

Start the Flex installer:
chmod a+x flexbuilder_linux_install_a3_033108.bin
./flexbuilder_linux_install_a3_033108.bin
At the end of the install process, it may explain that you need to manually copy a file to the Firefox 2 plugins directory:
sudo cp Adobe_Flex_Builder_Linux/Player/linux/install_flash_player_9_linux/libflashplayer.so /usr/lib/firefox/plugins/
Start Eclipse and the Flex Builder 3 Plugin should be available.

HOW TO: Run 32-bit Eclipse on a 64-bit Hardy Heron platform

Posted by Quinn Madson | Posted in , , , | Posted on 12:28 PM

0

At a command prompt run:

sudo apt-get install ia32-sun-java6-bin
... or get it from Synaptic.

Download a 32-bit version of Eclipse from: eclipse.org. Extract the package to your home directory.

Right click on the Gnome panel and select "Add to Panel..."

Select "Custom Application Launcher" and click "Add"
Name: Eclipse IDE
Command: /home/qk/eclipse/eclipse -vm /usr/lib/jvm/ia32-java-6-sun/bin/java
Comment:qk is the coolest :)
(You can also set the icon by clicking on the default icon and navigating to your eclipse install directory. Replace qk with your username and/or eclipse with where you put eclipse.)
Click "OK"

Click the Eclipse launcher and you should be all set.

HOW TO: Dual Monitors Hardy Heron 64-bit nVidia NV44 [Quadro NVS 285]

Posted by Quinn Madson | Posted in , , , | Posted on 10:28 AM

0

System>>Administration>>Hardware Drivers

Check "Enabled" for: NVIDIA accelerated graphics driver

After you hit "OK" a bunch of times a few drivers will be installed and you will be told to reboot.

After reboot, I still only had one screen come up. Edit /etc/X11/xorg.conf (back it up first) to look like this:

# If you have edited this file but would like it to be automatically updated
# again, run the following command:
# sudo dpkg-reconfigure -phigh xserver-xorg

Section "ServerLayout"
Identifier "Default Layout"
Screen "Default Screen" 0 0
InputDevice "Generic Keyboard" "CoreKeyboard"
InputDevice "Configured Mouse"
EndSection

Section "Module"
Load "glx"
EndSection

Section "InputDevice"
Identifier "Generic Keyboard"
Driver "kbd"
Option "XkbRules" "xorg"
Option "XkbModel" "pc105"
Option "XkbLayout" "us"
EndSection

Section "InputDevice"
Identifier "Configured Mouse"
Driver "mouse"
Option "CorePointer"
EndSection

Section "Monitor"
Identifier "Configured Monitor"
EndSection

Section "Device"
Identifier "Configured Video Device"
Driver "nvidia"
EndSection

Section "Screen"
Identifier "Default Screen"
Device "Configured Video Device"
Monitor "Configured Monitor"
DefaultDepth 24
Option "NoLogo" "False"
Option "RenderAccel" "True"
Option "TwinView"
Option "MetaModes" "1280x1024 1280x1024"
SubSection "Display"
Depth 24
Modes "nvidia-auto-select"
EndSubSection
EndSection

new machine; new os; new architecture;

Posted by Quinn Madson | Posted in , | Posted on 7:28 PM

1

I've been looking forward to getting the latest Ubuntu release 8.04 - Hardy Heron and at first glance, I'm a little disappointed.

Right out the gate, I wanted to connect to a secure webdav server (UWM PantherFile/Xythos) to get some back-up files. In Ubuntu 7.10 this was pretty easy: Places>>Connect to Server>>Secure WebDAV (HTTPS). This option was removed in 8.04 for some reason. It looks like I need to get some third party software like: cadaver to get it to work or wait for an update. Oddly enough, I heard that Mac's Leopard OS is also having network mounting issues.

The other thing I do on a fresh install at work is to bind the machine to my Synergy environment. Synergy client/server software allows me to use both Windows and Linux machines and use a single keyboard and mouse to use all the machines like a giant virtual desktop. According to the Ubuntu Forums and from my own experience, Synergy client pauses and dies 3 - 10 seconds into switching to the Ubuntu 8.04 machine unless the Synergy client is run as root. When it's run as root, everything works fine but, running an app like this as root does not seem like a good idea. Synergy is inherently insecure because all traffic is transmitted plain-text. For this reason, I run everything through SSH tunnels but even still running an app like this as root makes me feel a little exposed.

In all, it's worth the trouble as this machine is ridiculously over powered:
That's right -- the machine has 8 processors (dual quad-core Xeons) and 6 gigabytes of memory.

...which is where the next problem comes in. The machine has 64-bit architecture which I've never used before. I installed the Eclipse IDE 3.3.2, the CFEclipse plugin, and Sun Java 6.0 JDK with no issues. When I tried to install the Adobe Flex Builder 3 Alpha plugin, I got an error explaining that Flex 3 requires 32-bit architecture and Java JRE compiled for 32-bit. The error also states that this is possible but, I remain skeptical -- yet I will give it a shot tomorrow.

HOW TO: Set Flex MenuBar Currently Selected Item Text Color

Posted by Quinn Madson | Posted in , , | Posted on 7:34 AM

2

Seems like it should be fairly easy to let a user visually know which top level option they are currently under. ...like should be an option or options in Flex CSS.

Here's the best way I found to do it:

 <mx:Script>
<![CDATA[
private function menuHandler(event:MenuEvent):void {

var mb:MenuBar=event.target as MenuBar;
var selectedIndex:int=mb.selectedIndex;

for (var i:int=0;i<mb.menuBarItems.length;i++){
if(i==selectedIndex){
(mb.menuBarItems[i] as MenuBarItem).setStyle("color", "0xff7009");
}
else{
(mb.menuBarItems[i] as MenuBarItem).setStyle("color", "0xffffff");
}
}

if (event.item.@data != "top") {
logicHandler(event.item.@label, event.item.@data);
}
}
]]>
</mx:Script>
<mx:MenuBar id="appMenu"
x="0" y="114" width="100%" height="31"
labelField="@label"
dataProvider="{menuBarCollection}"
itemClick="menuHandler(event);" />

On the currently selected item, the text is set to orange. Everything else is reset to white. Example application.